How to Open an Above-Ground Pool in 10 Easy Steps
As an Amazon Associate, I earn from qualifying purchases.
Opening an above-ground pool the right way is essential but can be overwhelming if you have not done it before.
Don’t worry! This guide will walk you through how to open an above-ground pool, step by step.
From when to open it, to the supplies you’ll need, and the exact steps to follow, I’ve got you covered. Let’s dive in and make pool season stress-free!
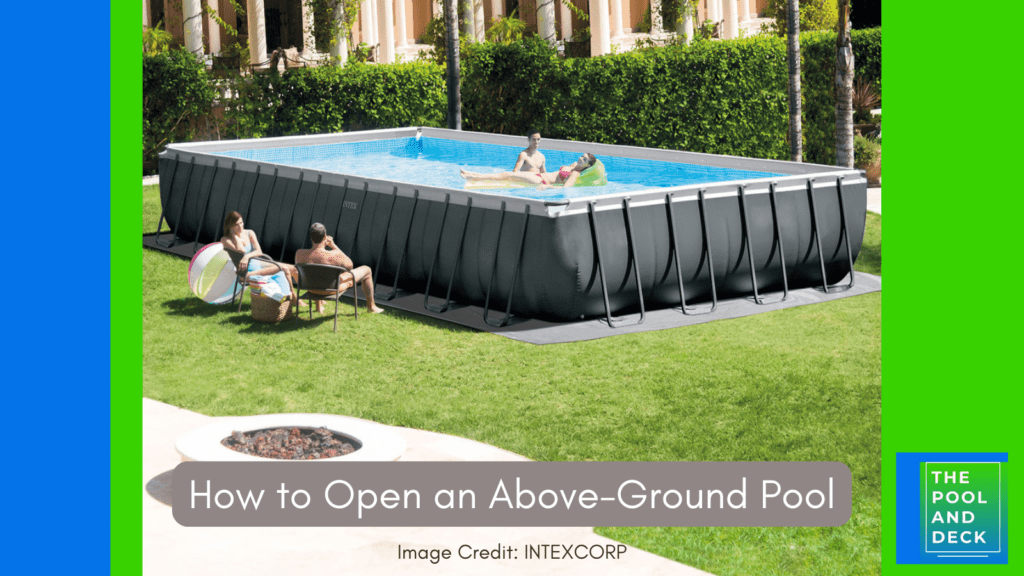
Table of Contents
How to Open an Above-Ground Pool: Key Takeaways
- Open your pool in late spring when temps are consistently above 70°F.
- Gather all tools, cleaning supplies, and chemicals before starting.
- Clear, remove, and clean the pool cover to avoid debris in the water.
- Reconnect equipment and ensure proper water flow by priming the pump.
- Test and balance water chemistry for safe and sparkling pool water.
- Shock the pool to eliminate bacteria and algae after winter.
- Run the filter for 24 hours to ensure proper circulation and cleaning.
The Best Time for Opening an Above-Ground Pool
Timing is everything when opening your pool. Aim for late spring when daily temperatures consistently stay above 70°F.
Opening too early might mean more maintenance, while waiting too long can allow algae to grow and make cleaning harder.
Choosing the right time helps you balance convenience and cost. It also ensures that your pool is ready when the first hot day of summer arrives!
Supplies Needed for Opening an Above-Ground Pool
Before you start, gather everything you’ll need to make the process smooth and efficient. Having the right tools and chemicals on hand will save you time and frustration.
Cleaning Supplies
You’ll need a few basic tools to clean your pool and its surroundings:
- Pool cover pump or sump pump to remove water from your winter cover.
- Winter pool cover cleaner to properly clean and store the cover.
- Skimmer net with a telescoping pole to remove floating debris.
- Pool brush to scrub the walls and floor.
- Pool vacuum for deeper cleaning.
Chemicals
Despite the pool cover, your above-ground pool is not immune to the accumulation of pathogens and contaminants. Naturally, it will need to be dosed with all the right chemicals to ensure the water is safe, clean, and balanced.
Pro Tip: For new pool owners, HTH 91022 Swimming Pool Care Kit simplifies the process by bundling essential products.
Nonetheless, here’s a comprehensive list of chemicals you’ll need to open your pool and suggested products to make shopping easy.
1. Test Kit
- Purpose: Lets you test and monitor the pool water chemistry.
- Suggested Product: Taylor K-2005 Complete DPD 9-in-1 Test Kit
2. Chlorine (Regular Sanitation)
- Purpose: Sanitizes the water by killing bacteria and algae.
- Suggested Product: HTH 42055 Pool Care 3″ Chlorine Tabs Advanced
3. Clorine Stabilizer (Cyanuric Acid)
- Purpose: If you use the above Trichlor tablets, you won’t need this on a regular basis. However, you may need it when you open your pool and the CYA levels are low.
- Suggested Product: HTH 67061 Pool Care Stabilizer
3. Pool Shock
- Purpose: This is required on a weekly basis and certainly for pool opening to eliminate all the accumulated bacteria, algae, and other contaminants.
- Suggested Product: HTH 52037 Pool Care Shock Advanced
4. pH Increaser
- Purpose: To increase the water pH level, if low.
- Suggested Products: HTH 67041 pH Up
5. pH Decreaser
- Purpose: To increase the water pH level, if low.
- Suggested Products: HTH Pool Care pH Down
6. Alkalinity Increaser
- Purpose: To increase Total Alkalinity (TA). Helps stabilize pH levels and prevents “pH bounce.”
- Suggested Product: HTH 67060 Pool Care Alkalinity Up
7. Alkalinity Decreaser
- Purpose: To decrease Total Alkalinity (TA). Helps stabilize pH levels and prevents “pH bounce.”
- Suggested Product: Acid Blue Muriatic Acid by CPDI
8. Calcium Hardness Increaser
- Purpose: Prevents corrosion of equipment and scaling on surfaces.
- Suggested Product: HTH 67059 Pool Care Calcium Hardness Up
9. Algaecide
- Purpose: Assists chlorine in preventing algae growth.
- Suggested Product: HTH 67089 Swimming Pool Care Algae Guard Ultra
10. Water Clarifier & Pool Flocculant
- Purpose: Helps the filter remove fine particles that cloud water. Flocculant helps clump bigger particles so that they drop to the floor and can be vacuumed.
- Suggested Product: HTH 67023 Super Clarifier and HTH 67080 Pool Care Drop Out Flocculant
11. Metal Sequestrant
- Purpose: Prevents discoloration of pool water caused by excess metals.
- Suggested Product: Pool Mate Metal Out Stain and Mineral Inhibitor
Tools and Equipment
Keep these handy for pool setup:
- A Phillips head screwdriver set or nut driver to reconnect equipment.
- Wrench (if needed) – for reassembling equipment.
- A garden hose with a pre-filter to add clean water.
- Safety goggles and chemical-resistant gloves – for handling chemicals safely.
Pro Tip: Ask a friend to help. Tasks like removing the pool cover or reconnecting equipment are much easier with an extra set of hands!
Bookmark this page, or download my Free Printable PDF Checklist on “Supplies Needed for Opening an Above-Ground Pool” by clicking on the link below:
How to Open an Above-Ground Pool: Step-by-Step Guide
Now that you’ve got your supplies ready, it’s time to start opening your pool. Follow these 10 steps for a smooth, trouble-free process.
1. Clear the Winter Pool Cover
Before removing the cover, clean it to prevent debris from falling into the pool.
- Use a skimmer net or a soft broom to gently sweep off leaves, twigs, and dirt.
- If water has collected on the cover, pump it off using a pool cover pump or a sump pump.
- Work carefully to avoid damaging the cover while removing debris.
2. Remove the Pool Cover
Once the cover is clear, remove it carefully to avoid spilling debris into the pool.
- Ask a friend to help you lift and fold the cover evenly . This prevents unnecessary stretching or tearing.
- Work slowly and systematically, starting from one side and moving across the pool.
3. Clean and Store the Pool Cover
Properly cleaning and storing the cover extends its lifespan and ensures it’s ready for next season.
- Lay the cover flat on a clean surface, such as a deck, driveway or lawn.
- Wash it using a soft brush and a pool cover cleaner (or mild detergent). Scrub off dirt, algae, and stains.
- Rinse thoroughly and let it dry completely in the sun to prevent mold or mildew.
- Fold the cover neatly and store it in a sealed bag or container to keep pests and dirt away.
4. Remove Winter Plugs and Ice Compensators
Take out any winterizing items used to protect your pool during the cold months.
- Remove all winter plugs from return jets, skimmer baskets, and equipment openings.
- If you used an ice compensator in the skimmer, take it out carefully to avoid damage.
5. Top Up the Pool Water
Bring your pool water up to the correct level before turning on any equipment.
- Use a garden hose with a pre-filter to fill the pool. A pre-filter helps remove impurities like rust or sediment.
- Add water until it reaches the middle of the skimmer opening.
6. Reconnect Equipment and Prime the Pump
Once your pool water is at the correct level, it’s time to reconnect and set up your equipment.
Steps:
- Reconnect the plumbing lines:
- Attach the hoses or pipes that connect the skimmer to the pump, the pump to the filter, and the filter to the return jet.
- Ensure all connections are secure to prevent leaks.
- Reassemble any additional equipment:
- If you use a heater, chlorinator, or other add-ons, reconnect them according to the manufacturer’s instructions.
- Flush antifreeze if used:
- If you added antifreeze during winterization, switch your pump to the “waste” setting and run it briefly to flush the lines.
- Prime the pump:
- Open the pump lid and pour water into it to help the system start.
- Close the lid tightly, ensuring the O-ring is clean and lubricated.
- Check for proper function:
- Turn on the pump and check that water is flowing through the system. If not, recheck the connections and prime the pump again.
Address any equipment damage or failures by replacing the parts. If you are not sure of how to do it get professional help.
7. Clean the Pool
Give your pool a thorough cleaning with the pump and filtration system running.
Steps:
- Skim the water surface:
- Remove floating leaves, bugs, and other debris using a skimmer net.
- Brush the pool walls and floor:
- Use a pool brush to scrub the walls, floor, and steps, loosening dirt and algae.
- Pay special attention to corners and crevices where debris can get lodged.
- Vacuum the pool:
- Connect your pool vacuum and clean the bottom of the pool to remove settled dirt and debris.
- Move slowly to avoid stirring up debris before it’s vacuumed.
Now you can proceed with testing and balancing the pool water chemistry.
8. Test and Balance the Water Chemistry
Here are the steps to follow:
Steps:
- Test the water:
- Use a reliable pool test kit or test strips to measure key chemical levels, including:
- pH
- Alkalinity
- Cyanuric acid
- Free chlorine
- Calcium hardness
- Alternatively, take a water sample to a pool supply store for professional testing.
- Use a reliable pool test kit or test strips to measure key chemical levels, including:
- Balance the chemicals in the correct order:
- Adjust alkalinity first to a range of 100–120 ppm. In case the Total Alkalinity is out of range it may result in “pH bounce” and make it extremely difficult to get it to the recommended level.
- Adjust pH to within 7.4–7.6 for swimmer comfort and effective sanitizer performance.
- Test and adjust calcium hardness to 175–225 ppm to prevent corrosion or scaling.
- Test and top up cyanuric acid to (30–50 ppm) to protect chlorine from breaking down rapidly in sunlight.
- Add chlorine to maintain a free chlorine level of 1–3 ppm.
- Take your time:
- Add the chemicals separately and in the right sequence.
- Allow chemicals to circulate for a few hours after each adjustment before retesting. This ensures accurate readings and prevents overcorrection.
9. (Double) Shock the Pool
Shocking your pool is the final and arguably the most important step to eliminate bacteria, algae, and contaminants that may have built up during the off-season.
When opening an above-ground pool, it is best to use double the recommended shock dose for a thorough job. Alternatively, you can repeat the pool shocking procedure twice.
Steps:
- Choose your shock product:
- Use either granular pool shock or liquid shock. Follow the manufacturer’s directions for dosing.
- Add the shock at the right time:
- Shock your pool in the evening or after sunset to prevent sunlight from degrading the chlorine.
- Distribute evenly:
- Pour the shock around the perimeter of the pool to ensure even distribution.
- Run the filter:
- Keep the filter running for at least 24 hours to circulate the shock and clear the water.
Double-shocking the pool gives it a fresh start, removing contaminants and leaving it safe for swimming.
Run the pool filter for a few hours before adding algaecide.
10. Run the Filter
Once the pool is shocked, run the filter continually for a few hours to eliminate dead algae and oxidized contaminants.
Steps:
- Run the filter continuously:
- Operate the filter for at least 24 hours after shocking the pool.
- This ensures proper circulation and allows the chemicals to work effectively.
- Check and clean the filter frequently:
- During the first few days, your filter will likely collect lots of debris.
- Clean or backwash the filter when the pressure drops. A drop in pressure is an indication of the pool filter getting clogged.
- Monitor water clarity:
- After 24 hours, the water should begin to clear. If it remains cloudy, retest and adjust the water chemistry as needed.
Should the pool water still look cloudy use either a clarifier or a flocculant to clear it. Should the water look green but clear you will need to add a metal sequestrant.
The infographic below gives the acceptable and ideal range for the 5 key pool chemistry parameters.
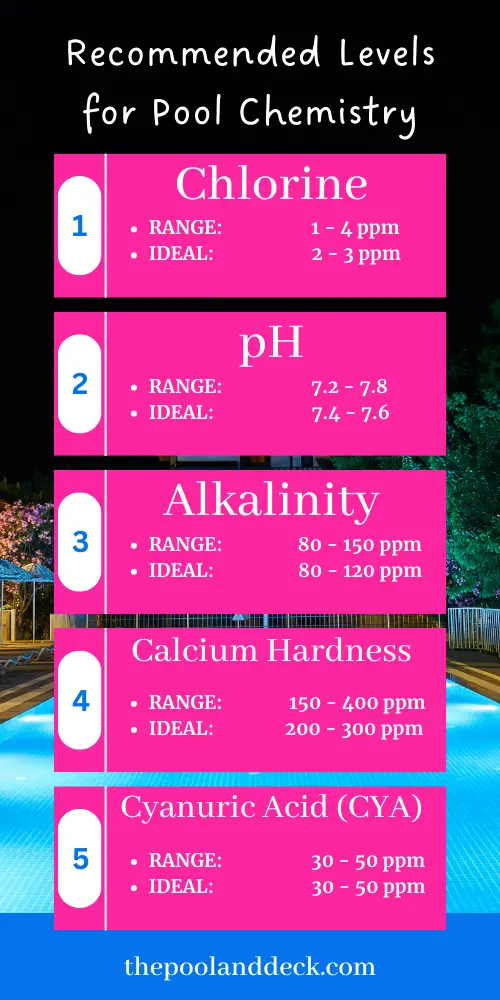
Adjust as required. Add Trichlor tablets in floaters or in the skimmer to keep your pool sanitized as you, your family and your friends start using the pool.
Bookmark this page, or download my Free Printable PDF Checklist on “How to Open an Above-Ground Pool: Step-by-Step Guide” by clicking on the link below:
Enjoy Your Pool!
Congratulations! Your above-ground pool is now clean, balanced, and ready for use. All that’s left is to grab your swimsuit and enjoy the water!
Remember, consistent maintenance throughout the season will keep your pool in great shape. Skim, brush, and test your water regularly, and your pool will stay clear and inviting all summer long.

